 ### Header
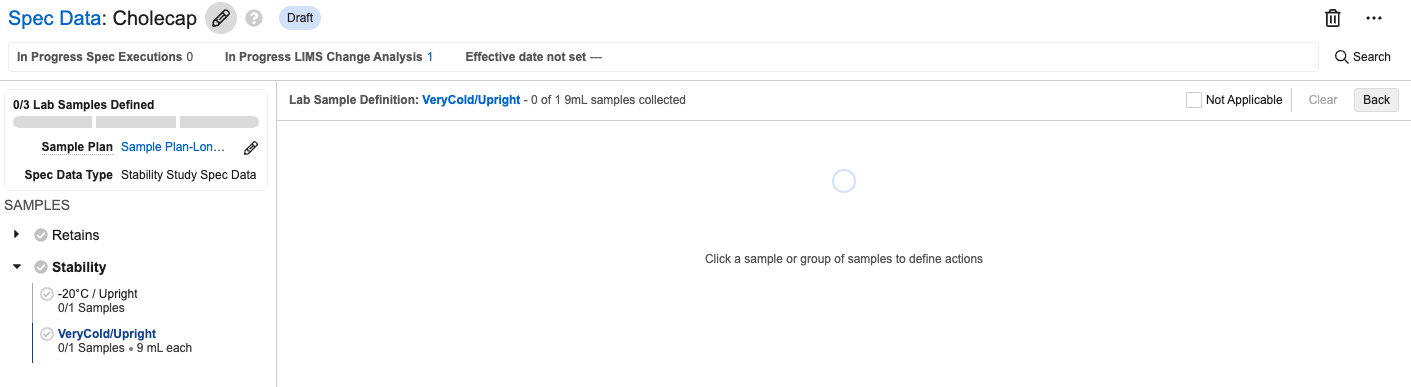
The header includes the following metadata:
* **Name**: The *Spec Data*'s name. You can edit this field inline.
* **Lifecycle State**: A badge showing the current lifecycle state of the *Spec Data*.
* **In Progress Spec Executions**: The number of non-cancelled *Spec Executions* for this version of the *Spec Data*. You can click this number to open a list view of the *Spec Executions* in a new tab.
* **In Progress Change Analysis**: The number of in-progress Change Analyses for this *Spec Data*. This value can only be 0 or 1. You can click this number to open a list view of the Change Analysis in a new tab.
* **Effective Date**:
* If the record is superseded, this shows the *Previously Effective* date range.
* If the record is not effective or superseded, this shows the date the record will be effective, if set.
* If the record is effective, this shows the date it was made effective.
* **Sample Plan**: The *Sample Plan* associated with this *Spec Data* record. You can click this name to view the *Sample Plan* in a new browser tab. If there is not currently an associated *Sample Plan*, you can select one from within the Spec Data Builder.
* **Spec Data Type**: *Batch Release* or *Stability Study*. You cannot modify this field.
* **Samples to be Defined**: The total number of samples to be collected followed by the numbers of them that are In Process, Release, and Backup.
The header also includes a *Search* button. Click this button to open a dialog that allows you to search *Lab Sample Definitions* within the *Spec Data*.
### Left Panel
You can collapse or expand the left panel as desired. It lists the *Sample Types* and *Sample Definitions* as well as any [*Chart Definitions*](/en/lr/33542/). There is a collapsable section for every active *Sample Type* picklist value in the associated *Sample Plan*. Within each of those sections, *Sample Definitions* are displayed based on the *Sample Definition Order*, or alphabetically if no order is set. For each *Sample Definition*, the following fields are listed:
* *Sample Definition Name*
* *Sample Collection Count*
* *Amount*
* *Unit*
### Right Panel
The right panel is the main work area for configuring your *Spec Data*. In addition to the work area, this panel includes the *Next* and *Back* buttons for navigating between sections and the *Not Applicable* checkbox. This checkbox is not available for some required subsections. Checking this box deletes any configuration records in the current subsection and marks it as complete. If you configure something in that subsection later, the *Not Applicable* checkbox is automatically cleared. When you check *Not Applicable* for a *Sample Definition*, it also decrements the denominator for *Lab Samples Defined*.
Select a *Sample Definition* in the left panel to configure it in the right. After selecting a *Sample Definition*, the right panel shows a header containing the following:
* **Sample Definition Name**: Click this name to view the *Sample Definition* record details in a new browser tab
* **Sample Type**
* **Samples Defined**
* **Samples Remaining**
Below the header, the panel displays a circle for each of the *Samples Defined*. Select one or more consecutive circles to configure *Sample Actions* for their associated *Samples*. You can configure the following types of actions:
* **Test Action**: Available for any *Spec Data Type* and number of samples
* **Aliquot Action**: Available for any *Spec Data Type* but can only be configured for one sample at a time
* **Collect Action**: Only available for the *Stability Study Spec Data Type* and can only be configured for one sample at a time
### Header
The header includes the following metadata:
* **Name**: The *Spec Data*'s name. You can edit this field inline.
* **Lifecycle State**: A badge showing the current lifecycle state of the *Spec Data*.
* **In Progress Spec Executions**: The number of non-cancelled *Spec Executions* for this version of the *Spec Data*. You can click this number to open a list view of the *Spec Executions* in a new tab.
* **In Progress Change Analysis**: The number of in-progress Change Analyses for this *Spec Data*. This value can only be 0 or 1. You can click this number to open a list view of the Change Analysis in a new tab.
* **Effective Date**:
* If the record is superseded, this shows the *Previously Effective* date range.
* If the record is not effective or superseded, this shows the date the record will be effective, if set.
* If the record is effective, this shows the date it was made effective.
* **Sample Plan**: The *Sample Plan* associated with this *Spec Data* record. You can click this name to view the *Sample Plan* in a new browser tab. If there is not currently an associated *Sample Plan*, you can select one from within the Spec Data Builder.
* **Spec Data Type**: *Batch Release* or *Stability Study*. You cannot modify this field.
* **Samples to be Defined**: The total number of samples to be collected followed by the numbers of them that are In Process, Release, and Backup.
The header also includes a *Search* button. Click this button to open a dialog that allows you to search *Lab Sample Definitions* within the *Spec Data*.
### Left Panel
You can collapse or expand the left panel as desired. It lists the *Sample Types* and *Sample Definitions* as well as any [*Chart Definitions*](/en/lr/33542/). There is a collapsable section for every active *Sample Type* picklist value in the associated *Sample Plan*. Within each of those sections, *Sample Definitions* are displayed based on the *Sample Definition Order*, or alphabetically if no order is set. For each *Sample Definition*, the following fields are listed:
* *Sample Definition Name*
* *Sample Collection Count*
* *Amount*
* *Unit*
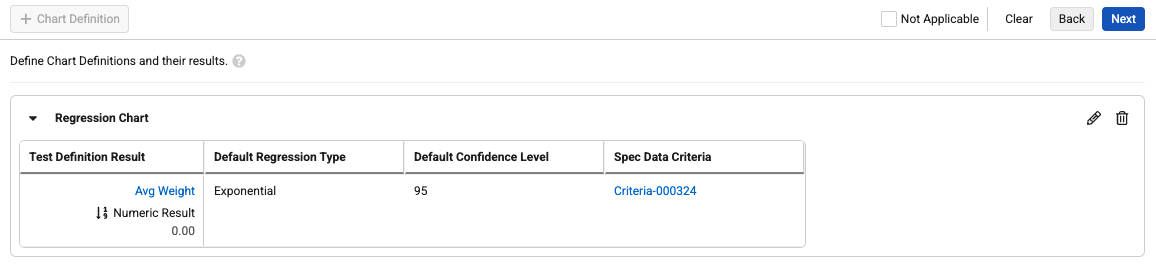
### Right Panel
The right panel is the main work area for configuring your *Spec Data*. In addition to the work area, this panel includes the *Next* and *Back* buttons for navigating between sections and the *Not Applicable* checkbox. This checkbox is not available for some required subsections. Checking this box deletes any configuration records in the current subsection and marks it as complete. If you configure something in that subsection later, the *Not Applicable* checkbox is automatically cleared. When you check *Not Applicable* for a *Sample Definition*, it also decrements the denominator for *Lab Samples Defined*.
Select a *Sample Definition* in the left panel to configure it in the right. After selecting a *Sample Definition*, the right panel shows a header containing the following:
* **Sample Definition Name**: Click this name to view the *Sample Definition* record details in a new browser tab
* **Sample Type**
* **Samples Defined**
* **Samples Remaining**
Below the header, the panel displays a circle for each of the *Samples Defined*. Select one or more consecutive circles to configure *Sample Actions* for their associated *Samples*. You can configure the following types of actions:
* **Test Action**: Available for any *Spec Data Type* and number of samples
* **Aliquot Action**: Available for any *Spec Data Type* but can only be configured for one sample at a time
* **Collect Action**: Only available for the *Stability Study Spec Data Type* and can only be configured for one sample at a time
Note: You cannot directly create a Select Action using the Design Data Builder, but when you create a Test Action or Aliquot Action, the system automatically creates a Select Action alongside it.
 and
and
 icons in their respective collapsible sections.
 ### Spec Data Builder Keyboard Shortcuts
You can use the following keyboard shortcuts to navigate the Spec Data Builder. When moving between elements using the keyboard, the focus cycles through UI elements in the following order: header, right panel, and left panel.
| **Action** | **Windows Shortcut** | **Mac Shortcut** |
| ----------------------------------------------- | ---------------- | ---------------- |
| Move to next element on screen | `
### Spec Data Builder Keyboard Shortcuts
You can use the following keyboard shortcuts to navigate the Spec Data Builder. When moving between elements using the keyboard, the focus cycles through UI elements in the following order: header, right panel, and left panel.
| **Action** | **Windows Shortcut** | **Mac Shortcut** |
| ----------------------------------------------- | ---------------- | ---------------- |
| Move to next element on screen | `