The Design Data Builder feature allows Spec Data Admins to create and manage Spec Data and Test Definitions using a UI that makes the process faster and less error-prone. If a Vault Admin has configured this feature and you have the proper permissions, the Design Data Builder UI automatically appears when you create, edit, or view a Test Definition.
If you navigate away from the Design Data Builder UI for a given Test Definition and return later, the system returns you to the last element of the builder that you accessed.
About the Design Data Builder UI
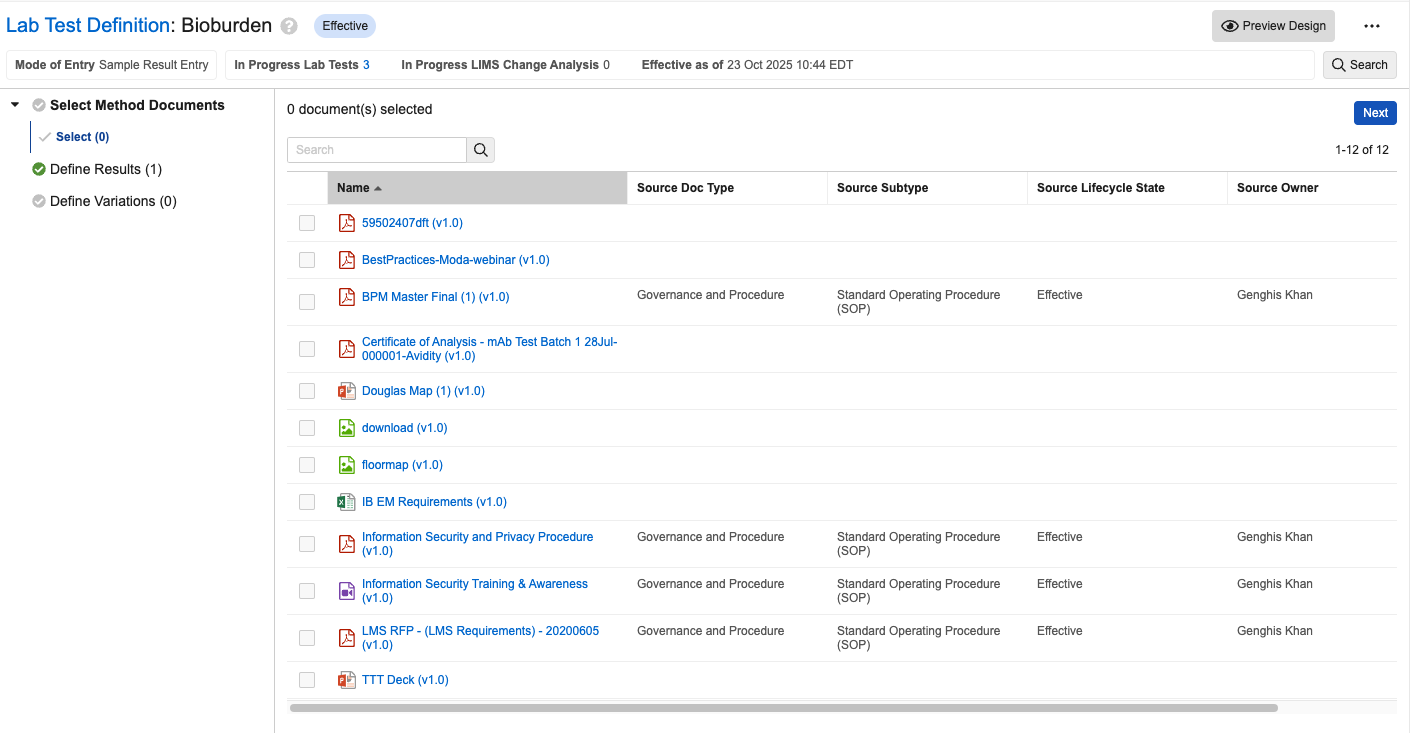
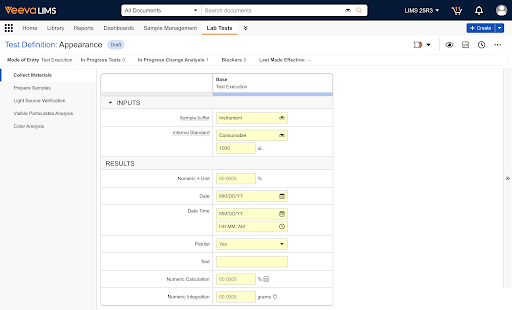
The Design Data Builder UI is split into a header, left panel, and right panel. The header lists the Test Definition’s Name, Mode of Entry, and other metadata. The left panel shows a summary of the configurable items, and the right panel is where you navigate through and make changes to those items.
Header
The header includes the following metadata:
- Name: The Test Definition’s name. You can edit this field inline.
- Lifecycle State: A badge showing the current lifecycle state of the Test Definition.
- Mode of Entry: Sample Result Entry or Test Execution. Some items in the UI differ based on this selection. You can edit this field inline.
- IN Progress Tests: The number of non-cancelled tests for this version of the Test Definition. You can click this number to open a list view of the tests in a new tab.
- In Progress Change Analysis: The number of in-progress Change Analyses for this Test Definition. This value can only be 0 or 1. You can click this number to open a list view of the Change Analysis in a new tab.
- Effective Date:
- If the record is superseded, this shows the Previously Effective date range.
- If the record is not effective or superseded, this shows the date the record will be effective, if set.
- If the record is effective, this shows the date it was made effective.
The header also includes a Search button. Click this button to open a dialog that allows you to search Inputs, Method Parameters, and Results within the Test Definition.
Left Panel
You can collapse or expand the left panel as desired. Its contents vary based on the record’s Mode of Entry.
If the Mode of Entry is Test Execution, it lists:
- Select Document
- Define Steps
- Define Variations
If the Mode of Entry is Sample Result Entry, it lists:
- Define Results
- Define Variation
Right Panel
As the main work area for configuring your Test Definition, this panel’s contents vary based on where you are in the configuration process. In addition to the work area, this panel includes the Next and Back buttons for navigating between sections and the Not Applicable checkbox. This checkbox is not available for some required subsections. Checking this box deletes any configuration records in the current subsection and marks it as complete. If you configure something in that subsection later, the Not Applicable checkbox is automatically cleared.
Test Definition Builder Keyboard Shortcuts
You can use the following keyboard shortcuts to navigate the Test Definition Builder. When moving between elements using the keyboard, the focus cycles through UI elements in the following order: header, right panel, document viewer, and left panel.
| Action | Windows Shortcut | Mac Shortcut |
|---|---|---|
| Move to next element on screen | <Tab> |
<Tab> |
| Move to previous element on screen | <Shift + Tab> |
<Shift + Tab> |
| Expand/collapse section, select focused element | <Enter> or <Space> |
<Enter> or <Space> |
| Close, back | <Esc> |
<Esc> |
Creating a Test Definition Using the Design Data Builder
To begin the creation process, navigate to the All Test Definitions view and complete the following steps:
- Click Create. This opens a simplified version of the Create Test Definition dialog that does not include custom fields.
- Enter a Name.
- Select a Mode of Entry.
- Optional: If you are creating a Test Definition for a multi stage test, set Is Multistage? to Yes.
- Optional: Enter a Test Method.
- Optional: Enter a Description.
- Click Save & Next.
- Select one or more Method Documents. If you do not need to include a Method Document, check Not Applicable.
- Click Next.
- Optional: Drag and drop the selected Method Documents to reorder them.
- Click Next.
- In the Define Steps section, repeat the following for each step you need to define. In this section, you can also edit, copy, or delete existing steps.
- Click + Step and enter a Name.
- Click Next.
- To create an Input, click + Input and enter the relevant fields. Repeat as many times as needed. For more information on these fields, see the standard Vault UI instructions. You can check the Not Applicable box if the Step does not require any Inputs.
- Click Next.
- To create a Result, click + Result and enter the relevant fields. Repeat as many times as needed. The fields to be entered vary based on the Result Type. For more information on these fields, see the standard Vault UI instructions. You can check the Not Applicable box if the Step does not require any Results.
- Optional: For each Result, You can also click + Criteria to add Test Definition Result Criteria.
- Optional: For each Result, You can also click + Detection Limit to add Limits of Detection.
- Optional: For each Result, You can also click + Quantification Limit to add Limits of Quantification.
- Optional: For each Result, enter a Number of Replicates. Replicates may be used for any results that require repetition such as for impurity testing or multi stage testing.
- Optional: For each Result, click View Additional Settings and check the Allow Ad Hoc Replicates box to allow users to manually add more Replicate Results.
- Click Next.
- Optional: If creating a Test Definition for multi stage testing, in the Define Groups & Stages section, you can reorder stages and set stage-level acceptance criteria.
- Optional: In the Define Results section, click +Variation to create a new Test Definition Variation. You can only create Variations for Test Definitions with at least one Input or Result. If you do not need to include a Test Definition Variation, check Not Applicable. When creating a Variation, if the Mode of Entry is Sample Result Entry, some invalid configuration options are not available.
- Optional: If creating a Variation, you can enter the following fields:
- Name
- Mode of Entry. You can only modify this field under certain conditions.
- Quality Control Sample Type. This field is only visible if Mode of Entry is Test Execution.
- Description
- Optional: If you created a Test Definition Variation, the next screen shows a list of the base Test Definition’s Inputs and Results. You can check the boxes beside them to associate them with the Variation. Some limitations apply.
Note: When adding a Calculated Method Parameter (a Test Set level Calculated Result) to a Test Definition using the Design Data Builder, Cross-Test and Aggregate variable types are not available for selection. Additionally, for Constant Variables, the Material constant type is not available.
Limitations of Test Definition Variation Results & Inputs
Keep the following limitations in mind when creating Test Definition Variations:
- Inputs:
- If the Test Definition Variation’s Mode of Entry is Sample Result Entry, you cannot associate any Inputs to the Variation.
- Results:
- If the base Test Definition’s Mode of Entry is Test Execution and the Test Definition Variation’s Mode of Entry is Sample Result Entry, you cannot associate Results with aggregate or cross-test variables to the Variation.
- If the base Test Definition’s Mode of Entry is Sample Result Entry and the Test Definition Variation’s Mode of Entry is Test Execution, you can only associate Results from the Default Step to the Variation.
- When you select a calculation Result as a Variation Result, any dependent Results it has are automatically selected as well and cannot be unselected. Results are considered dependent if they are targeted by variables used in the calculation’s formula.
About Updating Mode of Entry
You can only make changes to the Mode of Entry of a previously saved Test Definition under certain conditions. If the Mode of Entry is Sample Result Entry, you can always change it to Guided Test Execution. If the Mode of Entry is Guided Test Execution, you can only change it to Sample Result Entry if it meets all of the following requirements:
- No attached documents
- No Inputs
- No Method Parameters
- Only one Step
- Check integrations, SLRs, Cross Test, Aggregate
- No Variations with Mode of Entry of Guided Test Execution
About Preview Mode
If you have completed at least one Step for a Test Definition, you can preview it at any time by clicking the  icon. Click the icon again to exit Preview Mode.
Preview Mode shows what the Test Definition you have created will look like to Lab Analysts using it. However, you cannot enter data or interact with it.
The left panel shows all of the Steps you’ve created in the configured order. Navigate between Steps by clicking them in this list. For each Step, the right panel shows a table of Inputs and Results. If you have configured any Variations, they appear as additional columns to the right.
Required Permissions
To use the Test Definition Builder, you must have the following permissions:
- READ to the following Objects
- Test Definition
- Test Definition Step
- Test Definition Result
- READ to the following fields at the object level
- Mode Of Entry on Test Definition