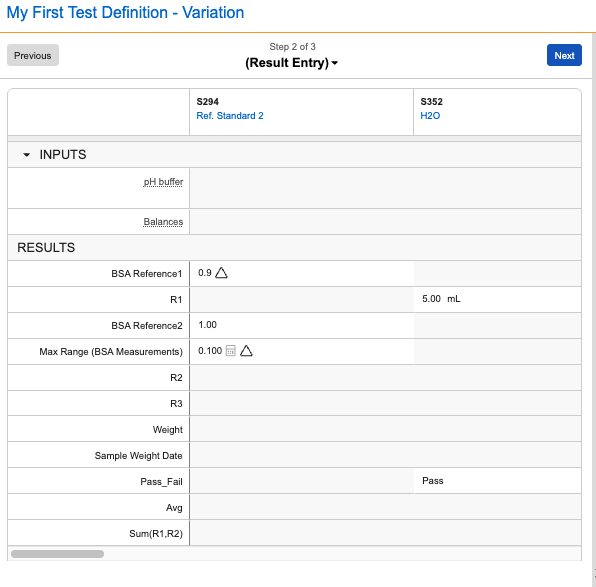
 ### Inputs Section
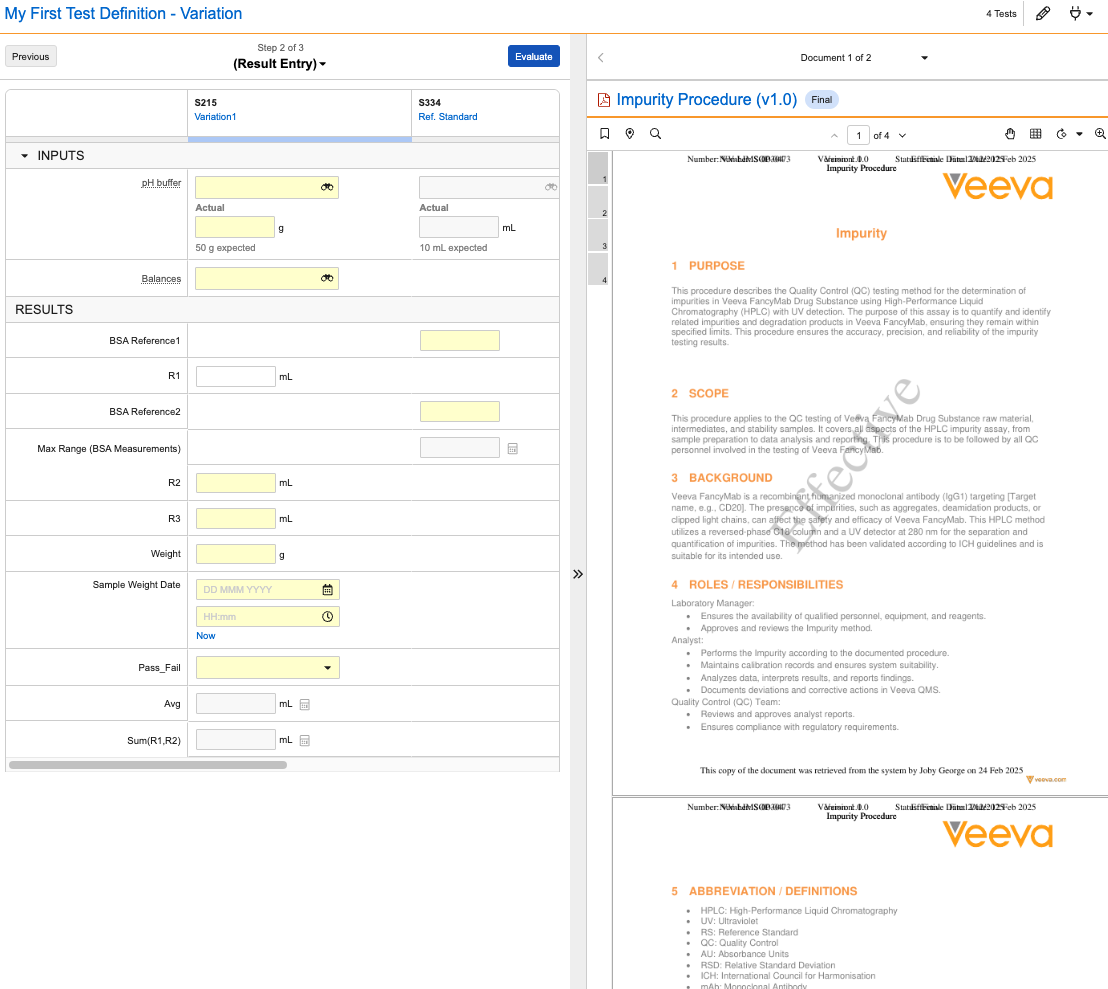
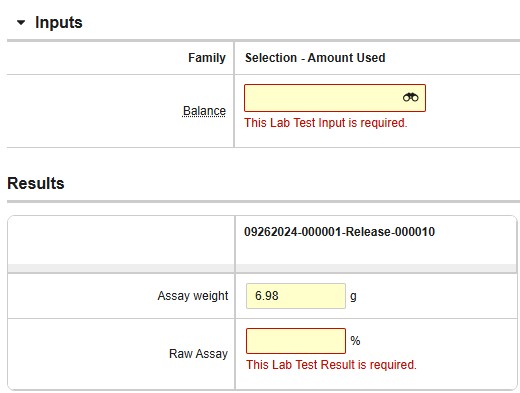
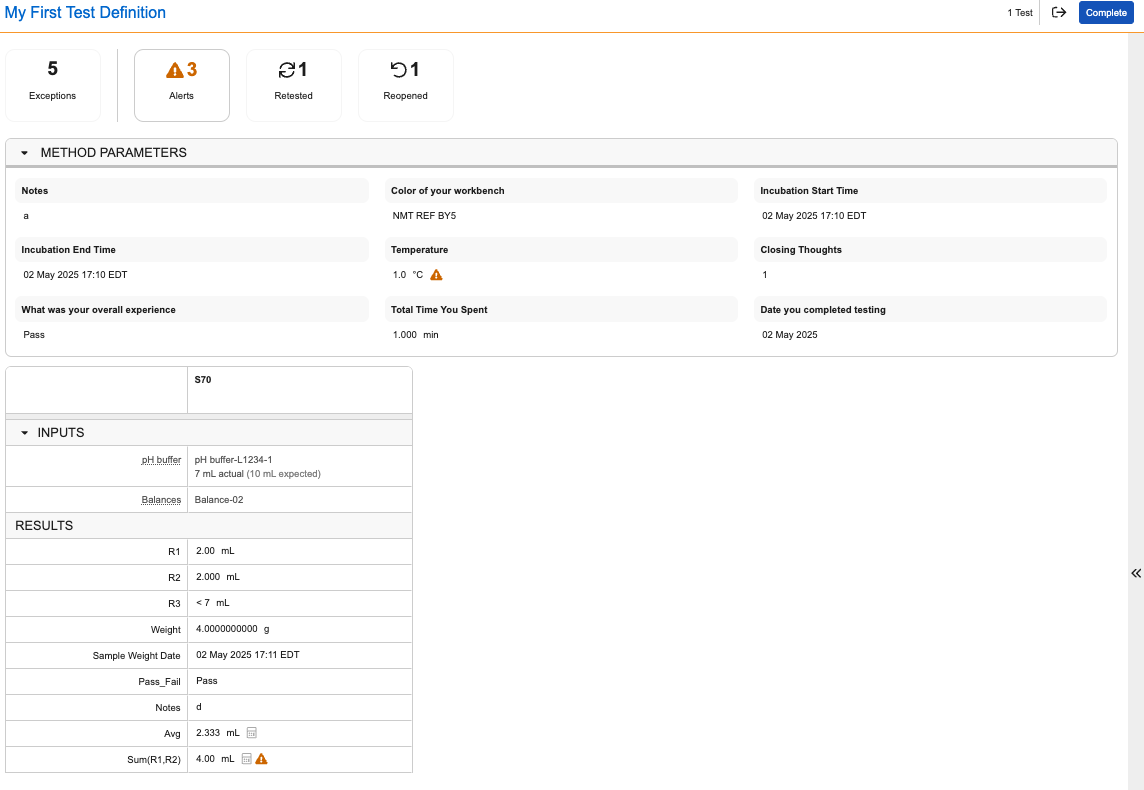
The upper left side of the test execution page is an Inputs grid which lists the inputs as rows and columns for the Selection (the user-selected input), an _Amount Used_ field to capture the amount (if applicable, only for consumables), and the _Expected Amount_ (if applicable, only for consumables).
### Results Grid
The lower left side of the test execution page is a grid, which lists the lab results to input in rows and the samples as columns. If applicable, any *Test Definition Variations* are also listed as columns below the sample name. In each cell, you can input a result corresponding to the row's result and the column's sample. You can add additional tests to the grid by performing the **Add Tests** action. If enabled, you can select **View Criteria Description** in the inline *Actions* menu to view a detailed product specification description for a given *Result*. A calculator icon beside the result entry cell indicates that Veeva LIMS will automatically calculate the result based on Spec Data when you click the **Evaluate** or **Verify** button.
### Method Parameters Grid
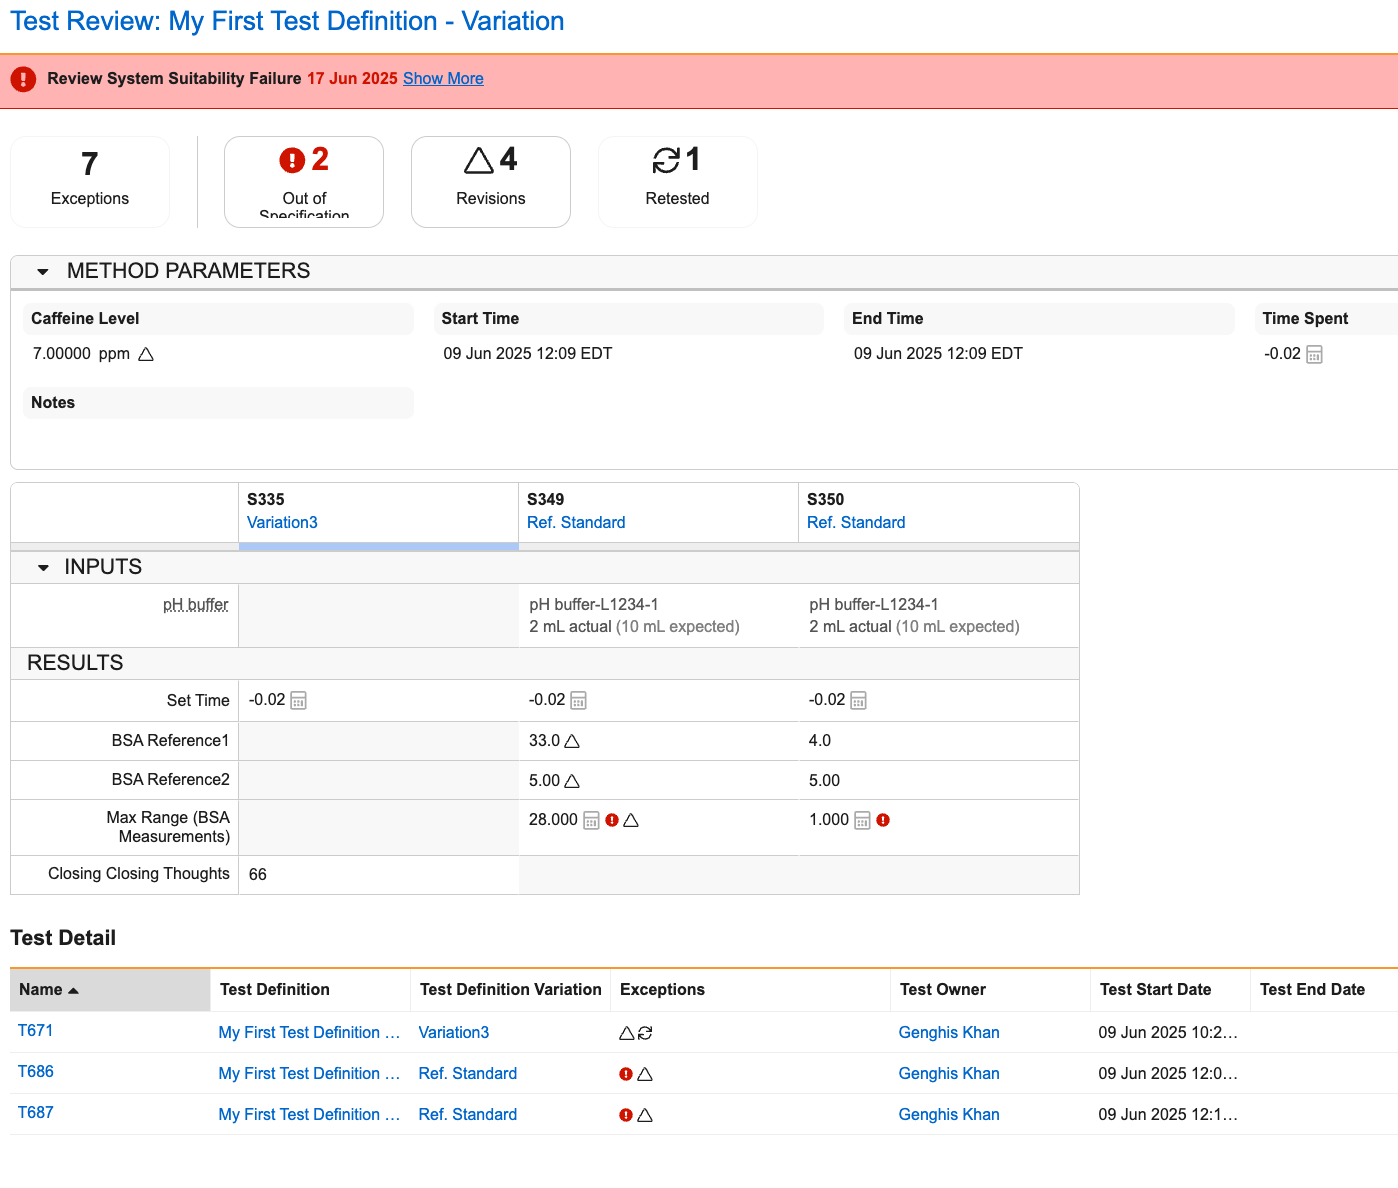
In cases where the applicable *Test Definition* includes *Results* at the *Test Set* level, the *Method Parameters* grid appears above the *Inputs* section. This grid is similar to the *Results* grid, but it lists *Lab Test Set Results* rather than *Lab Test Results*.
### Inputs Section
The upper left side of the test execution page is an Inputs grid which lists the inputs as rows and columns for the Selection (the user-selected input), an _Amount Used_ field to capture the amount (if applicable, only for consumables), and the _Expected Amount_ (if applicable, only for consumables).
### Results Grid
The lower left side of the test execution page is a grid, which lists the lab results to input in rows and the samples as columns. If applicable, any *Test Definition Variations* are also listed as columns below the sample name. In each cell, you can input a result corresponding to the row's result and the column's sample. You can add additional tests to the grid by performing the **Add Tests** action. If enabled, you can select **View Criteria Description** in the inline *Actions* menu to view a detailed product specification description for a given *Result*. A calculator icon beside the result entry cell indicates that Veeva LIMS will automatically calculate the result based on Spec Data when you click the **Evaluate** or **Verify** button.
### Method Parameters Grid
In cases where the applicable *Test Definition* includes *Results* at the *Test Set* level, the *Method Parameters* grid appears above the *Inputs* section. This grid is similar to the *Results* grid, but it lists *Lab Test Set Results* rather than *Lab Test Results*.
 ### Test Variations in the Test Execution UI
If your test includes [variations](/en/lr/51412703/#variations), the UI appears differently to visually represent differences in tests as a result of the variations. The following images show the Test Execution UI for a test without variations and a test with variations respectively.
### Test Variations in the Test Execution UI
If your test includes [variations](/en/lr/51412703/#variations), the UI appears differently to visually represent differences in tests as a result of the variations. The following images show the Test Execution UI for a test without variations and a test with variations respectively.
Note: Aggregate Results from different Test Variations do not appear in the Test Execution grid, even if they target the test in question.
Note: When the tests have variations, only variations with the exact same set of Inputs and Input parameters (for example, Expected Amount, Expected Amount Units, Required) can be added to the test set.
Note: Any formatted values that can be localized (such as date/time, date, or translations) are recorded based on the Vault timezone. If the Vault timezone changes, these formatted values are not updated.
 ### Editing a Lab Test Result After being Committed
To edit a *Lab Test Result* after it has been committed (after a user clicks the Evaluate, Next, or Verify button):
1. In the **Actions** menu within the result cell, select **Edit**.
2. Enter the revised value. Vault displays a **Commit** button and a **Discard** button.
3. If the new value is incorrect, click the **Discard** button to return to the original value. This stops the editing process and displays the previous result value in Read Only mode.
4. If the new value is correct, click the **Commit** button. Vault displays a task dialog where you can enter a change reason and your eSignature.
5. Click **Confirm**.
Any calculated results will be recalculated upon committing the new result value, which is included in the calculation.
### Editing an Input After being Committed
To edit an Input after it has been committed (after a user clicks the _Evaluate_, _Next_, or _Verify_ button):
1. In the **Actions** menu within the result cell, select **Edit**.
2. Enter the adjusted value. Vault displays a **Commit** button and a **Discard** button.
3. If the new value is incorrect, click the **Discard** button to return to the original value. This stops the editing process and displays the previous result value in Read Only mode.
4. If the new value is correct, click the **Commit** button. Vault displays a task dialog where you can enter a change reason and your eSignature.
5. Click **Confirm**.
### Completing a Lab Test
To complete a *Test Execution*, click **Complete**. Vault adds a date/time value to the *Test End Date* field of each *Lab Test* upon performing this action. The *Test* *End Date* field of the *Lab Test Set* is also populated. The *Lab Test*(s) and *Lab Test Set* move to the *Testing Complete* lifecycle state.
## Reopening a Test
Reopening a test allows you to revise the results of a test after it has been completed. To reopen a test:
1. Perform the **Reopen Lab Test** action on a *Lab Test* record or on the test execution page.
2. Click **Confirm** or **Start** (depending on configuration).
When you complete this action, Veeva LIMS automatically makes the following changes to the *Lab Test* and related records:
* The *Lab Test* moves out of the *Testing Complete* state type
* The *Reopen Start Date* date/time field is populated
* The *Complete* field on the *Lab Test* is set to *False*
* The *Complete* field on the *Lab Test Result(s)* is set to *False*
* The *Complete* field on the *Lab Inputs(s)* is set to *False*
* The related *Test Set* changes to the *In Verification* state type
Use the **Resume Test** action on the *Lab Test* to open *Test Execution*. After making any necessary revisions to the reopened test results or inputs, click the **Complete** button to move the *Lab Test* back to the *Testing Complete* state type. At this point the *Reopen End Date* date/time field is populated on the *Lab Test,* and the *Test Set* moves back to the *Testing Complete* lifecycle state.
### Editing a Lab Test Result After being Committed
To edit a *Lab Test Result* after it has been committed (after a user clicks the Evaluate, Next, or Verify button):
1. In the **Actions** menu within the result cell, select **Edit**.
2. Enter the revised value. Vault displays a **Commit** button and a **Discard** button.
3. If the new value is incorrect, click the **Discard** button to return to the original value. This stops the editing process and displays the previous result value in Read Only mode.
4. If the new value is correct, click the **Commit** button. Vault displays a task dialog where you can enter a change reason and your eSignature.
5. Click **Confirm**.
Any calculated results will be recalculated upon committing the new result value, which is included in the calculation.
### Editing an Input After being Committed
To edit an Input after it has been committed (after a user clicks the _Evaluate_, _Next_, or _Verify_ button):
1. In the **Actions** menu within the result cell, select **Edit**.
2. Enter the adjusted value. Vault displays a **Commit** button and a **Discard** button.
3. If the new value is incorrect, click the **Discard** button to return to the original value. This stops the editing process and displays the previous result value in Read Only mode.
4. If the new value is correct, click the **Commit** button. Vault displays a task dialog where you can enter a change reason and your eSignature.
5. Click **Confirm**.
### Completing a Lab Test
To complete a *Test Execution*, click **Complete**. Vault adds a date/time value to the *Test End Date* field of each *Lab Test* upon performing this action. The *Test* *End Date* field of the *Lab Test Set* is also populated. The *Lab Test*(s) and *Lab Test Set* move to the *Testing Complete* lifecycle state.
## Reopening a Test
Reopening a test allows you to revise the results of a test after it has been completed. To reopen a test:
1. Perform the **Reopen Lab Test** action on a *Lab Test* record or on the test execution page.
2. Click **Confirm** or **Start** (depending on configuration).
When you complete this action, Veeva LIMS automatically makes the following changes to the *Lab Test* and related records:
* The *Lab Test* moves out of the *Testing Complete* state type
* The *Reopen Start Date* date/time field is populated
* The *Complete* field on the *Lab Test* is set to *False*
* The *Complete* field on the *Lab Test Result(s)* is set to *False*
* The *Complete* field on the *Lab Inputs(s)* is set to *False*
* The related *Test Set* changes to the *In Verification* state type
Use the **Resume Test** action on the *Lab Test* to open *Test Execution*. After making any necessary revisions to the reopened test results or inputs, click the **Complete** button to move the *Lab Test* back to the *Testing Complete* state type. At this point the *Reopen End Date* date/time field is populated on the *Lab Test,* and the *Test Set* moves back to the *Testing Complete* lifecycle state.
Note: You cannot reopen a Lab Test that is used as part of a Stability Study’s Initial Timepoint without first reopening the Initial Timepoint Spec Execution.
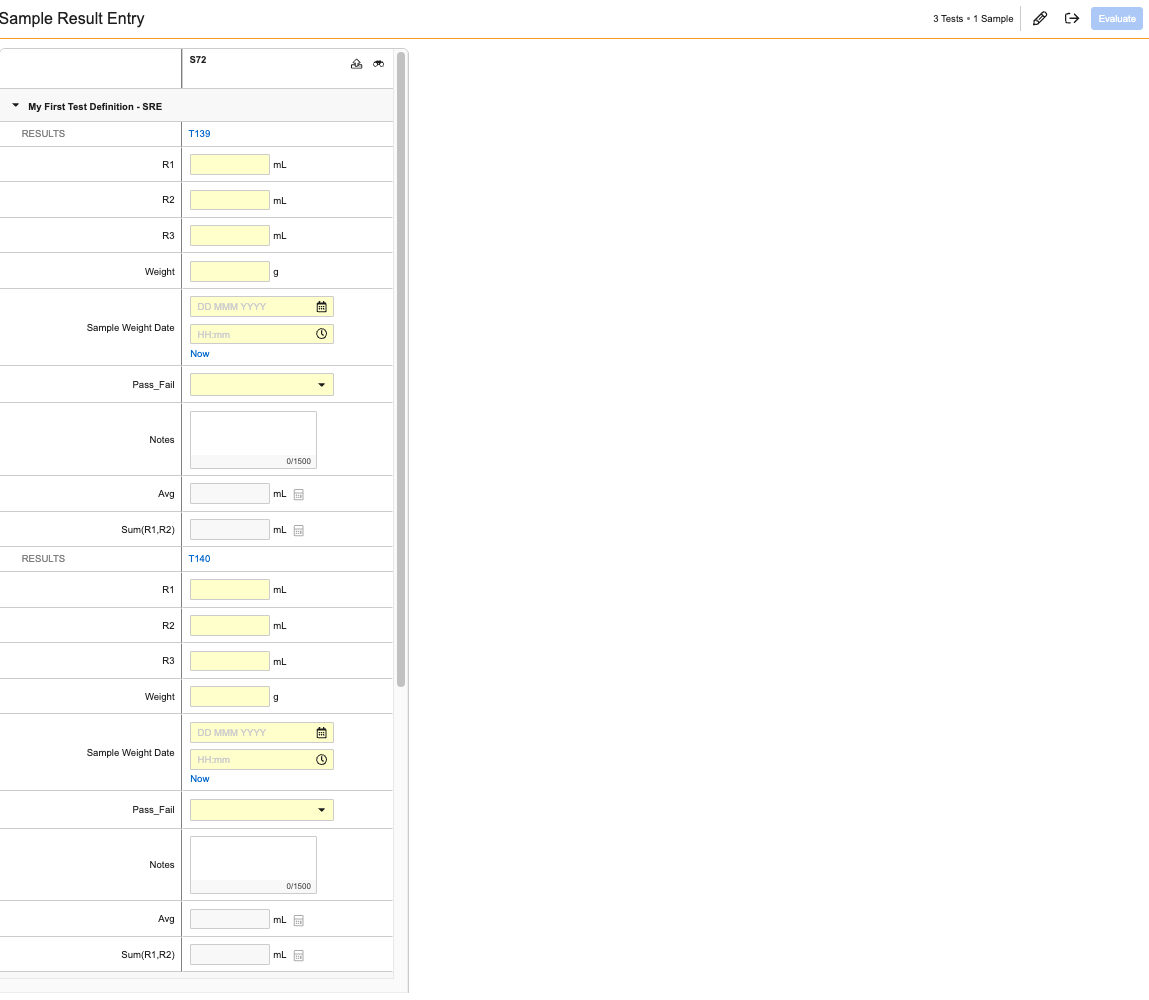 To directly transcribe sample results:
1. From the *Lab Sample* record's **Actions** menu, select **Launch Sample Result Entry**.
2. Click **Continue**.
3. On the *Sample Results Entry* page, enter your results.
4. Click **Evaluate**. This option is only selectable once you have populated all required results for each of the sample's tests. If you need to change a result after the evaluation, open the **Actions** menu within the result's cell and select **Edit**. This action prompts you for an eSignature upon changing the result.
5. Click **Verify** to see all of your results and any applicable exceptions.
6. Click **Complete**.
## Lab Result Alerts {#alerts}
The Results grid displays alerts for cells under certain circumstances. While some alerts are only displayed in the review phase of testing, the following can also be displayed during initial input:
|Alert Symbol|Indicates|Description|
|---|---|---|
|
To directly transcribe sample results:
1. From the *Lab Sample* record's **Actions** menu, select **Launch Sample Result Entry**.
2. Click **Continue**.
3. On the *Sample Results Entry* page, enter your results.
4. Click **Evaluate**. This option is only selectable once you have populated all required results for each of the sample's tests. If you need to change a result after the evaluation, open the **Actions** menu within the result's cell and select **Edit**. This action prompts you for an eSignature upon changing the result.
5. Click **Verify** to see all of your results and any applicable exceptions.
6. Click **Complete**.
## Lab Result Alerts {#alerts}
The Results grid displays alerts for cells under certain circumstances. While some alerts are only displayed in the review phase of testing, the following can also be displayed during initial input:
|Alert Symbol|Indicates|Description|
|---|---|---|
|  | Invalid Entry | The value in this cell is not of the type expected for this Lab Result. |
### Review Alerts
The following alerts can only display once the test has entered the review phase:
|Alert Symbol|Indicates|Description|
|---|---|---|
|
| Invalid Entry | The value in this cell is not of the type expected for this Lab Result. |
### Review Alerts
The following alerts can only display once the test has entered the review phase:
|Alert Symbol|Indicates|Description|
|---|---|---|
|  | Out of Specification | Appears when the result does not meet Criteria with indication of 'Out of Specification' |
|
| Out of Specification | Appears when the result does not meet Criteria with indication of 'Out of Specification' |
|  | Previously Out of Specification | Appears when a result was out of specification prior to being edited, and is no longer out of specification |
|
| Previously Out of Specification | Appears when a result was out of specification prior to being edited, and is no longer out of specification |
|  | Out of Control | Appears when the result does not meet Criteria with indication of 'Alert' |
|
| Out of Control | Appears when the result does not meet Criteria with indication of 'Alert' |
|  | Revised | Appears when a result was changed after result evaluation |
|
| Revised | Appears when a result was changed after result evaluation |
|  | Overridden Data Entry Method | Appears when a value was expected to be a calculation or from an instrument and it was manually entered instead |
|
| Overridden Data Entry Method | Appears when a value was expected to be a calculation or from an instrument and it was manually entered instead |
|  | Reopened | Appears when the _Lab Test_ has been reopened |
|
| Reopened | Appears when the _Lab Test_ has been reopened |
|  | Retested | Appears when the _Lab Test_ has been retested |
|
| Retested | Appears when the _Lab Test_ has been retested |
|  | Additions | Appears when a test has been added manually |
## Related Permissions
For Analysts to execute tests, they must have a security profile or role which grants them the following permissions:
|Type|Permission|Control|
|---|---|---|
| Security Profile | Object: Lab Test: View, Edit | Ability to view and begin _Lab Tests_. |
| Security Profile | Objects: Test Definition, Test Definition Step, Test Definition Result, Test Definition Input, Test Definition Variation, Test Definition Variation Input, Test Definition Variation Result, Lab Result Picklist, Lab Result Picklist Option, Spec Data, Spec Data Criteria: View | Ability to view the Spec Data from which the testing is performed and evaluated |
| Security Profile | Object: Lab Test Result, Lab Test Result Change: View, Edit | Ability to view and edit _Lab Test Results_ |
| Security Profile | Object: Lab Test Input, Lab Test Input Change Set: View, Edit | Ability to view and edit _Lab Test Inputs_ |
| Security Profile | Objects: Lab Criteria Evaluation, Lab Test Result Change Signature, Lab Test Input Change Set Signature, Lab Sample, Lab Test, Lab Test Signature: View | Ability to view data related to the _Lab Test_ or _Lab Result_ |
[0]: #selector
[1]: #alerts
| Additions | Appears when a test has been added manually |
## Related Permissions
For Analysts to execute tests, they must have a security profile or role which grants them the following permissions:
|Type|Permission|Control|
|---|---|---|
| Security Profile | Object: Lab Test: View, Edit | Ability to view and begin _Lab Tests_. |
| Security Profile | Objects: Test Definition, Test Definition Step, Test Definition Result, Test Definition Input, Test Definition Variation, Test Definition Variation Input, Test Definition Variation Result, Lab Result Picklist, Lab Result Picklist Option, Spec Data, Spec Data Criteria: View | Ability to view the Spec Data from which the testing is performed and evaluated |
| Security Profile | Object: Lab Test Result, Lab Test Result Change: View, Edit | Ability to view and edit _Lab Test Results_ |
| Security Profile | Object: Lab Test Input, Lab Test Input Change Set: View, Edit | Ability to view and edit _Lab Test Inputs_ |
| Security Profile | Objects: Lab Criteria Evaluation, Lab Test Result Change Signature, Lab Test Input Change Set Signature, Lab Sample, Lab Test, Lab Test Signature: View | Ability to view data related to the _Lab Test_ or _Lab Result_ |
[0]: #selector
[1]: #alerts