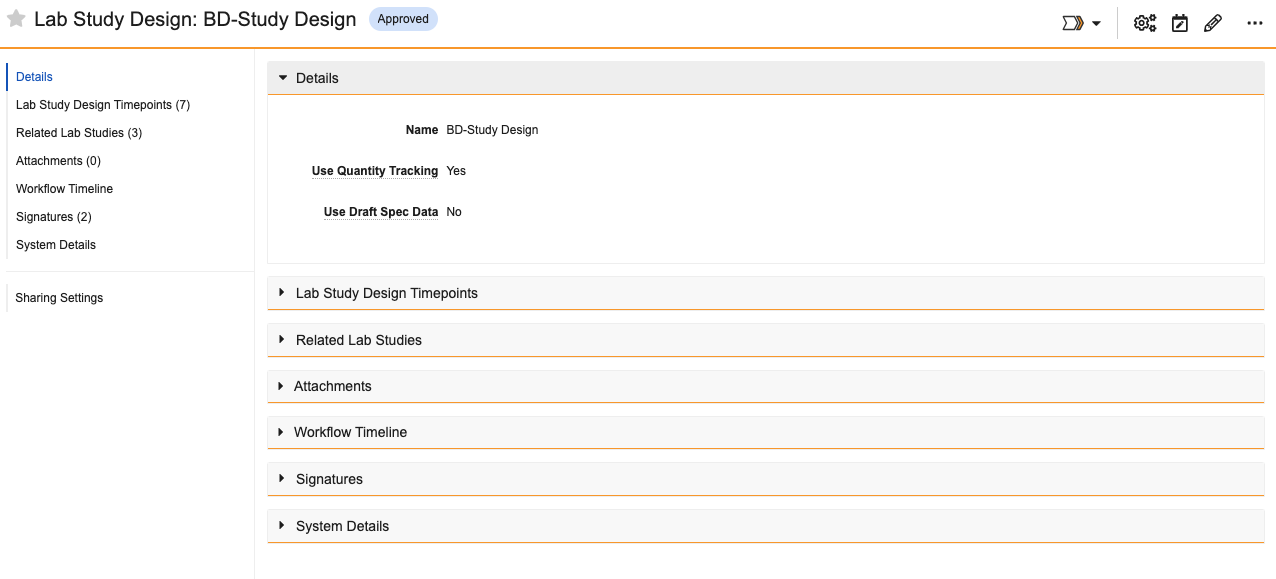
 On the resulting *Lab Study Design* record page, you can add and modify *Lab Study Design Timepoints* as needed. Select **Actions > Review Study Overview** to view the full overview.
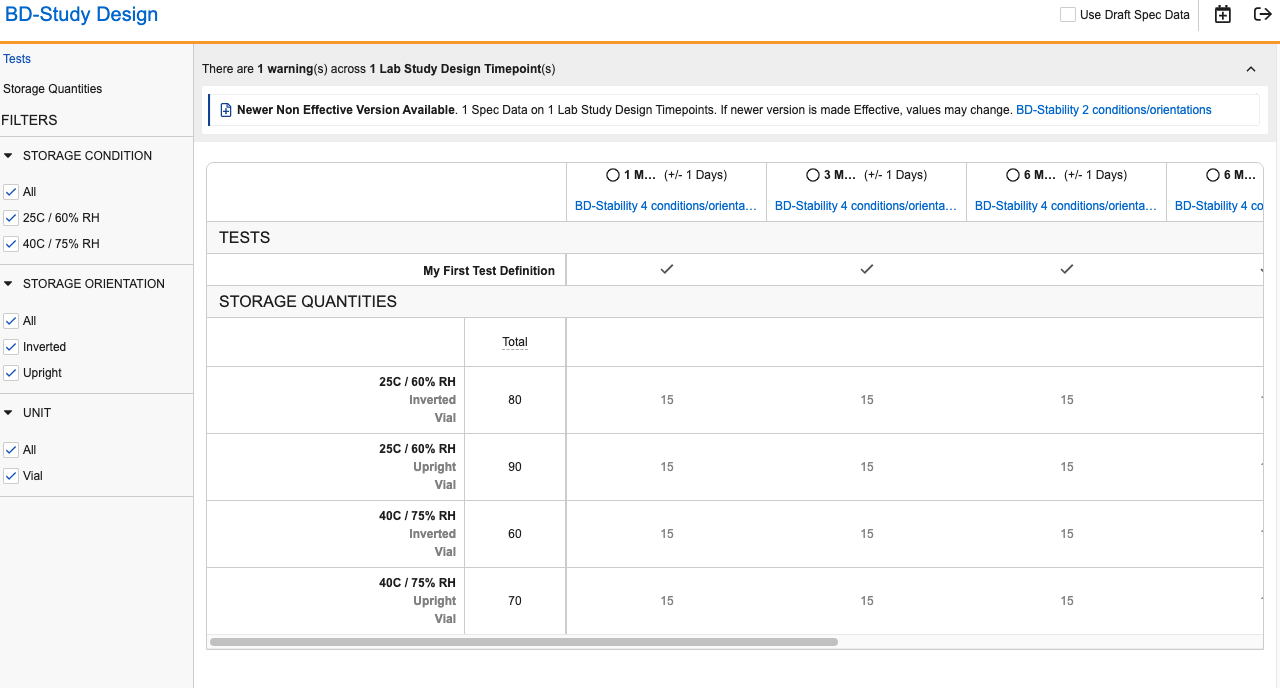 Once a *Lab Study Design* has been created, it must be reviewed and approved before it can be used to generate new *Lab Study* records. During review, the Spec Data Version Check can be initiated. This is an action (either an entry action in the record's lifecycle or manually started by a user via **Actions > Spec Data Version Check**) that verifies that each *Spec Data* record associated to the Timepoints has an Effective version.
### About Pull Windows and Pull Compliance
When creating *Lab Study Design Timepoints*, the *Lower Pull Window* and *Upper Pull Window* represent the amount of time before and after the Timepoint's *Scheduled Start Date* during which the sample should be pulled to be compliant. Enter a number in the *Lower Pull Window* field and use the *Lower Pull Window Units* drop-down to define the unit of time. This determines how many days before the *Scheduled Start Date* the pull may be completed. For example, if you set *Lower Pull Window* to *3* and select *days* in *Lower Pull Window Units*, the sample can be pulled 3 days before or after its *Scheduled Start Date* and still be compliant. Likewise, enter a number in the *Upper Pull Window* field and select a unit in the *Upper Pull Window Units* drop-down to set the amount of time after the *Scheduled Start Date* the pull may be completed.
LIMS uses your entries along with the *Scheduled Start Date* to automatically calculate the *Earliest Pull Date* and *Latest Pull Date* on each *Lab Study Timepoint* record. When the sample is eventually pulled, LIMS also automatically sets the *Pull Compliance Status* field, which Stability Managers can use to easily track whether the sample was pulled within the allowed window. The *Pull Compliance Status* can be set to the following values:
* **Within Schedule**: The sample pull date was on or after the *Earliest Pull Date* and on or before the *Latest Pull Date*.
* **Early**: The sample pull date was before the *Earliest Pull Date*.
* **Late**: The sample pull date was after the *Latest Pull Date*.
## Generating a Lab Study
To create a *Lab Study*:
1. From your approved *Lab Study Design* record, select **Actions > Generate Lab Study**.
2. Enter a **Name** for the *Lab Study*. If you do not enter a name, the *Lab Study* will have the same name as the *Lab Study Design*.
3. Click **Generate**. The system automatically sets you as the *Owner* of the *Lab Study*.
Once a *Lab Study Design* has been created, it must be reviewed and approved before it can be used to generate new *Lab Study* records. During review, the Spec Data Version Check can be initiated. This is an action (either an entry action in the record's lifecycle or manually started by a user via **Actions > Spec Data Version Check**) that verifies that each *Spec Data* record associated to the Timepoints has an Effective version.
### About Pull Windows and Pull Compliance
When creating *Lab Study Design Timepoints*, the *Lower Pull Window* and *Upper Pull Window* represent the amount of time before and after the Timepoint's *Scheduled Start Date* during which the sample should be pulled to be compliant. Enter a number in the *Lower Pull Window* field and use the *Lower Pull Window Units* drop-down to define the unit of time. This determines how many days before the *Scheduled Start Date* the pull may be completed. For example, if you set *Lower Pull Window* to *3* and select *days* in *Lower Pull Window Units*, the sample can be pulled 3 days before or after its *Scheduled Start Date* and still be compliant. Likewise, enter a number in the *Upper Pull Window* field and select a unit in the *Upper Pull Window Units* drop-down to set the amount of time after the *Scheduled Start Date* the pull may be completed.
LIMS uses your entries along with the *Scheduled Start Date* to automatically calculate the *Earliest Pull Date* and *Latest Pull Date* on each *Lab Study Timepoint* record. When the sample is eventually pulled, LIMS also automatically sets the *Pull Compliance Status* field, which Stability Managers can use to easily track whether the sample was pulled within the allowed window. The *Pull Compliance Status* can be set to the following values:
* **Within Schedule**: The sample pull date was on or after the *Earliest Pull Date* and on or before the *Latest Pull Date*.
* **Early**: The sample pull date was before the *Earliest Pull Date*.
* **Late**: The sample pull date was after the *Latest Pull Date*.
## Generating a Lab Study
To create a *Lab Study*:
1. From your approved *Lab Study Design* record, select **Actions > Generate Lab Study**.
2. Enter a **Name** for the *Lab Study*. If you do not enter a name, the *Lab Study* will have the same name as the *Lab Study Design*.
3. Click **Generate**. The system automatically sets you as the *Owner* of the *Lab Study*.
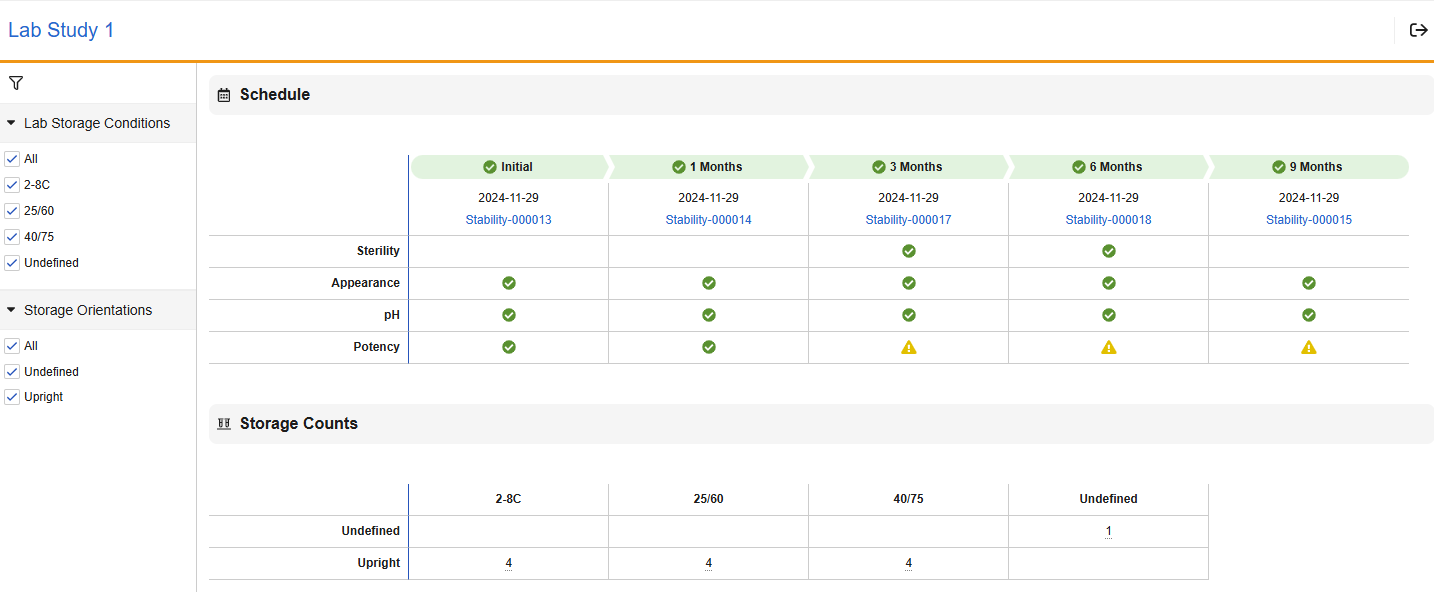
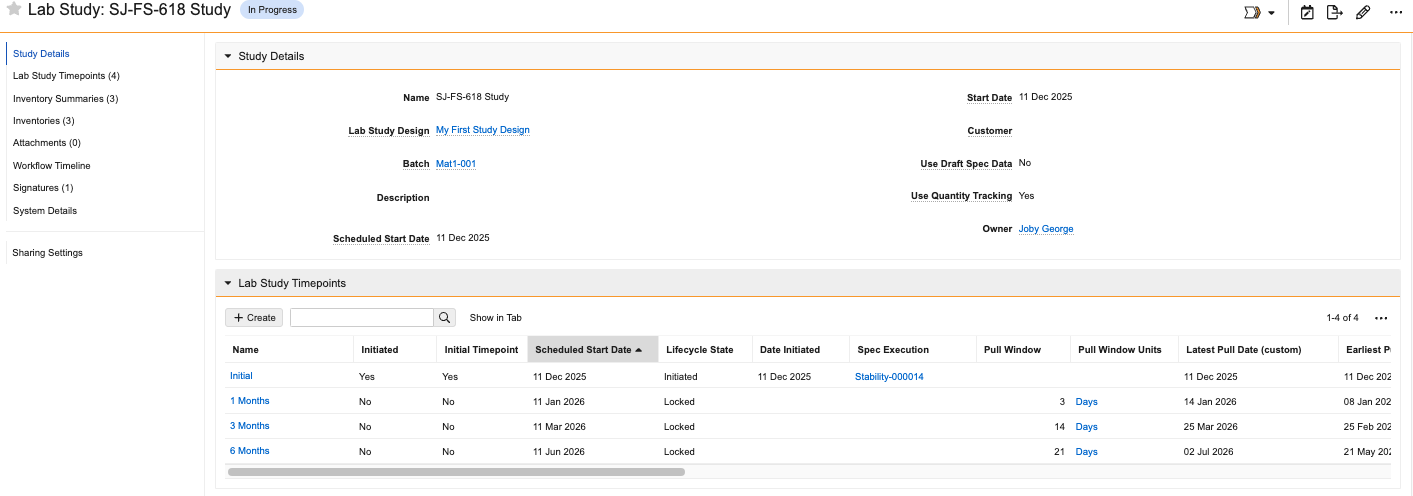 On the resulting *Lab Study* record page, you can add and modify *Lab Study Timepoints* as needed. Select **Actions > Review Study Schedule** to view the full schedule.
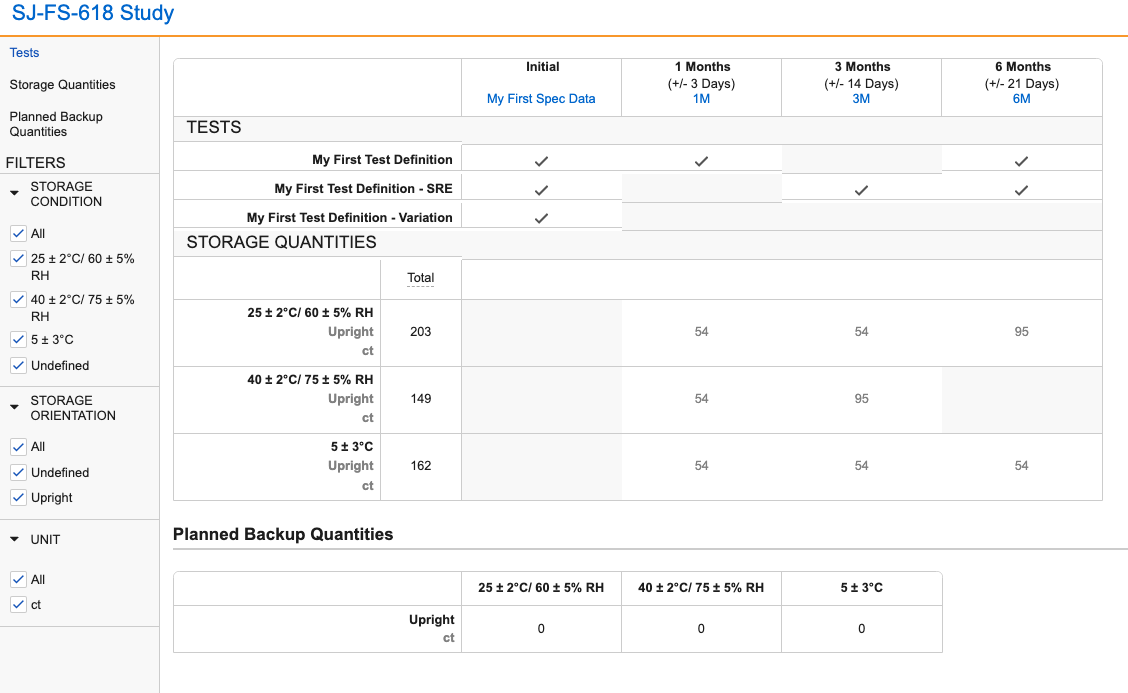 In the *TESTS* table, the first column shows the *Initial Timepoint*, and the following columns show any subsequent *Timepoints*. For each *Timepoint*, the label shows the *Timepoint* itself and the associated *Spec Data* below. Each row represents a scheduled *Test*.
Click the **Exit** icon in the upper right to close the schedule.
To begin the *Lab Study*:
1. Select **Start Workflow > Initiate Lab Study**.
2. Optional: Enter a **Start Date**. If you leave this field blank, it defaults to the current date.
3. Click **Start**.
Initiating the *Lab Study* performs the following actions:
* Sets the *Study Start Date*
* Sets *Scheduled* *Start Dates* on all *Timepoints*
* Sets the *Earliest Pull Date* and *Latest Pull Date* on all *Timepoints* with a Pull Window available
* Initiates any *Initial Timepoints*
* Sets the *Date Initiated*
* Sets the *Spec Data* field with the *Spec Data* version at timepoint initiation
* Generates the *Spec Execution* for the *Initial Timepoint*
* Sets the Study information on the *Spec Execution*
Once the *Lab Study* has been initiated, you can expand the **Lab Study Timepoints** section of the study's record details page to view a summary that includes the initiation date, scheduled dates for each *Timepoint*, and related *Spec Executions*.
In the *TESTS* table, the first column shows the *Initial Timepoint*, and the following columns show any subsequent *Timepoints*. For each *Timepoint*, the label shows the *Timepoint* itself and the associated *Spec Data* below. Each row represents a scheduled *Test*.
Click the **Exit** icon in the upper right to close the schedule.
To begin the *Lab Study*:
1. Select **Start Workflow > Initiate Lab Study**.
2. Optional: Enter a **Start Date**. If you leave this field blank, it defaults to the current date.
3. Click **Start**.
Initiating the *Lab Study* performs the following actions:
* Sets the *Study Start Date*
* Sets *Scheduled* *Start Dates* on all *Timepoints*
* Sets the *Earliest Pull Date* and *Latest Pull Date* on all *Timepoints* with a Pull Window available
* Initiates any *Initial Timepoints*
* Sets the *Date Initiated*
* Sets the *Spec Data* field with the *Spec Data* version at timepoint initiation
* Generates the *Spec Execution* for the *Initial Timepoint*
* Sets the Study information on the *Spec Execution*
Once the *Lab Study* has been initiated, you can expand the **Lab Study Timepoints** section of the study's record details page to view a summary that includes the initiation date, scheduled dates for each *Timepoint*, and related *Spec Executions*.
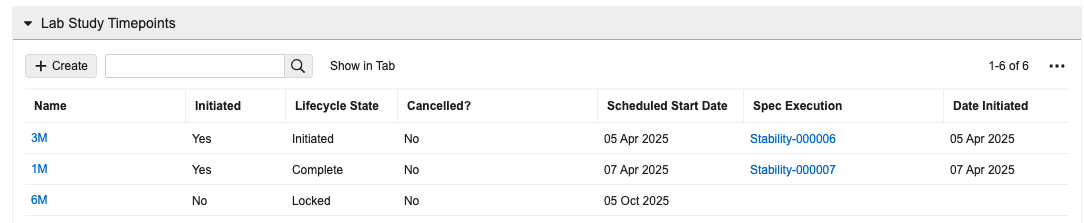 You can also initiate additional *Timepoints* by selecting **Actions > Initiate Lab Study Timepoint** in the Timepoint's cell within the *Lab Study Timepoints* section of the *Lab Study* record's details page. Initiating a *Timepoint* creates a *Spec Execution* for it based on its *Spec Data* and relates it to the *Batch* associated with the *Lab Study*.
Note: For Initial Timepoints, the Spec Execution is not initiated automatically, so you must do that manually.
 ## Exporting Stability Data
If configured, users with the correct permissions can export the data from a *Lab Study* to an Excel or CSV file by selecting **Actions > Export to Excel** or **Export to CSV**.
## Exporting Stability Data
If configured, users with the correct permissions can export the data from a *Lab Study* to an Excel or CSV file by selecting **Actions > Export to Excel** or **Export to CSV**.